PRIMA Gaming Computers

Renova Home Computers

(Desktop Models Only)
November 2025
Version 1.01
Quick Start Guide
Here you will find a range of useful information that will guide you through your initial PRIMA Gaming PC setup.
1: Check contents
You should have the following:
- PC Tower
- Power Cable
- HDMI Cable
- USB Drive (Keep this safe, this is to reinstall Windows 11 should you ever need to! It also contains the drivers for your hardware.)
2: Remove internal packaging
Check the glass side of your new PC, there may be packaging inside you will need to remove before powering on. Simply twist off the four screws at holding the glass panel, remove the panel carefully, remove any packaging from inside, and replace the panel and screws – hand tightening is fine!
3: Plug in the power cable
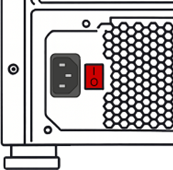
Once the PC is free from its packaging, locate the power cable supplied and plug each end into its correct socket; one in the PC and one in the wall. Make sure that the cable is fully inserted and flush against the PC. Leave the On/Off switch off for now! (I = On, O = Off)
4: Connect ethernet cable

Many of our systems come supplied with either onboard WiFi, or with preinstalled USB WiFi adapters – but If your system doesn’t have a WiFi connection, or if your PC is close enough to the router, you can still connect to the Internet by plugging in an Ethernet Cable into the Ethernet socket located on the back of the computer, and the other end into your router.
Even if you have a WiFi connection, if you are close enough to your router to have a wired connection it will almost always be faster!
5: Connect your monitor
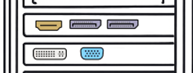
The next stage is to connect a monitor. Locate the connection cable and plug one end into the back of the screen, and the other into the correct port at the back of your PC. This will likely be HDMI – but if you are using multiple monitors you may need to use DVI or DisplayPort cables or adapters as well.
Important: If your computer has a dedicated graphics card, ensure you connect the monitor to the output on the graphics card and not the outputs on the motherboard (close to the USB ports).
6: Connect keyboard & mouse
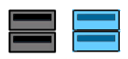
Now it is time to connect a keyboard and mouse. To do so, plug each cable (or Bluetooth dongle if that is what they use) into a spare USB port at the back of the PC.
Although your computer has front and rear USB ports, it is always preferable to use the rear ports where possible.
Tip: Most keyboards and mice are USB 1.1 or 2.0 devices so it’s best to connect these to black coloured USB ports. The blue coloured ports are USB 3.0 ports and will benefit other devices more.
7: Connect Speakers
If you are using external speakers, connect them to the green 3.5mm port at the rear of the computer.
If you have one, you can also plug a microphone into the red 3.5mm port.
If there is an Optical Port this can be used to connect to a soundbar, TV or similar.
8: Flip the switch!
Flip the rear On/Off switch to “On” (or “I”). Turn on your monitor, and then you are ready to power on your new PC! You will find the power button on the front of the computer.
Your PC should now boot up – if it doesn’t, don’t worry – continue on to Troubleshooting!
Troubleshooting
- My PC will not turn on at all!
Please check the following:
- Make sure the power cable is firmly plugged into the back of the PC and into a working wall socket or power strip.
- If you are using a power strip or surge protector, ensure it is switched on.
- Check the power switch on the back of the PC (near the power cable). This must be set to ON ( I ), not OFF ( O ).
- Press the power button on the front of the PC and hold it for 1–2 seconds.
If there are no lights, no fans, and no sound, try a different wall socket or power cable if available.
- The PC turns on, but nothing appears on the screen
This is very common during first setup.
Check the display connection:
- Make sure the monitor is turned on.
- Confirm the video cable (HDMI / DisplayPort) is firmly connected at both ends.
- Ensure the cable is plugged into the graphics output on the PC, not the wrong port.
💡 If your PC has a graphics card, the cable must be connected to the graphics card ports, not the ports higher up on the motherboard.
- The monitor says “No Signal”
Try the following steps:
- Use the monitor’s buttons to check that the correct input source (HDMI, DisplayPort, etc.) is selected.
- Disconnect and reconnect the video cable at both ends.
- If possible, try a different cable or a different port on the PC or monitor.
- The PC turns on, but there is still no display
- Make sure all internal packaging has been removed from inside the PC case (such as protective foam).
- Turn the PC off, wait 10 seconds, then turn it back on.
- If your keyboard or mouse lights up but there is no display, this usually means the issue is related to the screen connection, not the PC itself.
- I hear the fans, but nothing happens on screen
This usually indicates a display setup issue:
- Double-check the monitor input selection.
- Ensure the cable is connected to the correct graphics output.
- Try connecting the PC to a different monitor or TV if available.
- My keyboard or mouse is not working
- Make sure they are plugged into the USB ports at the back of the PC.
- Try a different USB port.
- If using wireless devices, check that batteries are installed and the USB receiver is connected.
- When should I contact support?
Please contact us if:
- The PC does not power on after following all steps above.
- You see warning lights, hear repeated beeping, or notice unusual behaviour.
- You are unsure about anything during setup — we’re happy to help.
Have your order number ready when contacting support, as this will help us assist you more quickly.


